Complete Setup Guide
Follow this comprehensive guide to learn how to put together a goozii bread box correctly and efficiently. Free PDF available for download below.
Get your goozii bread box instructions PDF free for offline reference. Also available on YouTube with video tutorials.
Before We Begin - Goozii Bread Box Instructions
The Goozii bread box is a premium kitchen storage solution crafted from durable bamboo wood. It comes in two primary designs: the corner model (triangular shape designed to fit 90-degree kitchen corners) and the rectangular model (a standard countertop design). Both models feature a magnetic latch closure system, movable interior shelf for flexible storage, and transparent acrylic door windows for easy content visibility. The corner design maximizes countertop space by fitting snugly into corners, while the rectangular model works well on standard countertop surfaces. Understanding which model you have is your first critical step before beginning assembly.
Pre-Assembly Preparation: Creating the Optimal Work Environment
Begin by selecting a clean, flat, stable work surface such as a dining table, kitchen counter, or workbench. This flat surface is essential because any wobbling or unevenness will make aligning components difficult during assembly. Lay down a soft, protective material—preferably a towel or cloth—across your entire work surface. This protective layer serves a dual purpose: it protects your work surface from scratches and also protects the bamboo panels from getting marked, gouged, or damaged while you handle and position the components. The preventive care at this stage directly impacts the final appearance of your finished bread box.
Next, carefully unpack all components from the product packaging and lay them out on your protected work surface in organized groups. Take time to visually identify each piece before you begin. You should have: two side panels, one top panel, one bottom panel, one back panel, one front door with acrylic window, one movable shelf, one wooden handle, a complete magnetic latch set (typically consisting of a magnetic component and a strike plate), a complete hardware pack containing all necessary screws and dowels, either four rubber feet or three silicone foot stands (depending on your model), and the assembly instruction manual. Count all components to ensure nothing is missing. Missing components during midway assembly can significantly delay the project.
Understanding the Hardware Components
Your goozii bread box assembly kit includes several types of fasteners, each serving specific purposes. Wood screws are the primary fastening mechanism—these typically come in varying lengths (usually quarter-inch and half-inch varieties), with the longer screws used for connecting the side panels to the bottom and top panels, while shorter screws secure lighter components like hinges and handles. Dowels are wooden cylindrical pins used for additional structural support and alignment, typically inserted into pre-drilled holes to create joints with greater holding strength than screws alone. The magnetic latch set comprises two components: the magnetic keeper (installed inside the door) and the strike plate (installed on the bread box frame), which work together to create a secure, quiet closure. The rubber feet or silicone foot stands are protective elements that prevent the bread box from directly contacting your countertop, which protects against scratches and provides stability. Before you begin tightening any fasteners, familiarize yourself with which hardware goes where by reviewing your instruction manual's hardware diagram.
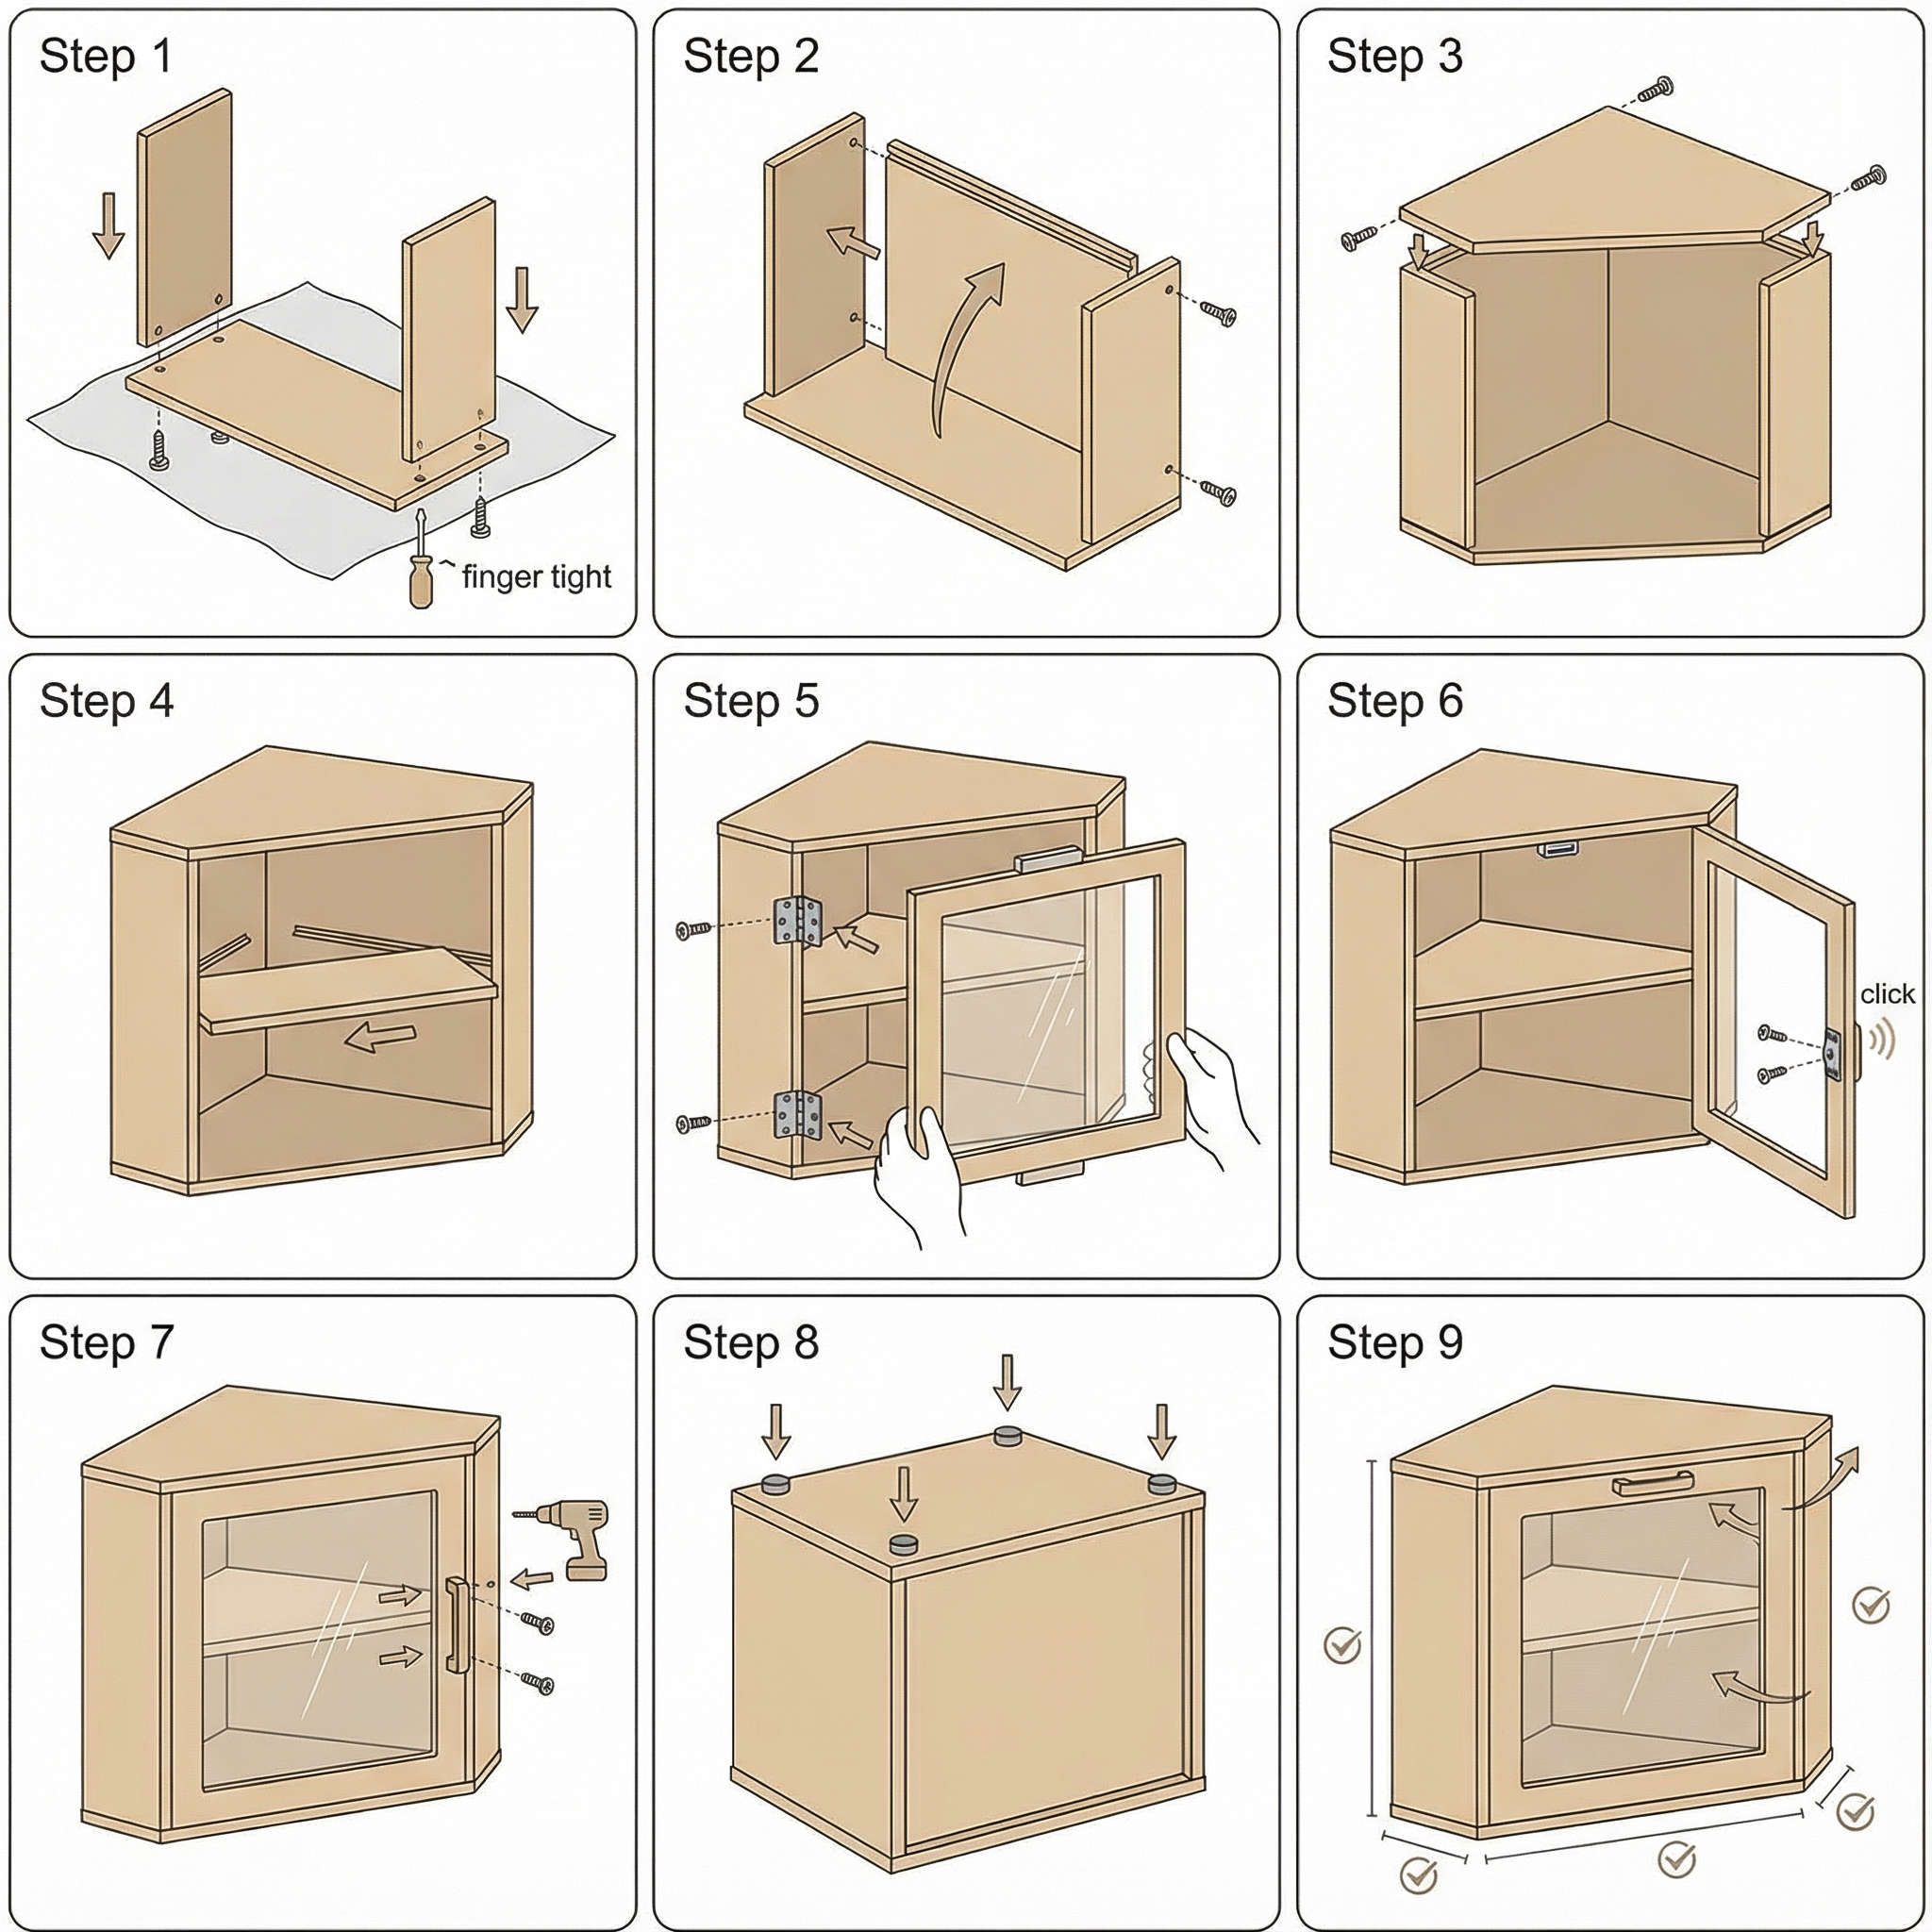
Step 1: How to Assemble Goozii Bread Box - Attaching Side Panels
This first assembly step establishes the foundational structure of your bread box. Position the bottom panel on your work surface with the protective cloth still in place. Locate the first side panel—these are typically the two narrower rectangular or angled pieces. If your model is a corner bread box, these panels will have triangular or angled edges that form the 90-degree corner shape. If it's a rectangular model, these will be straightforward rectangular panels.
Before inserting any screws, perform a dry fit test: position the side panel vertically against the edge of the bottom panel, ensuring it aligns perfectly flush with the bottom edge. Check that any pre-drilled holes on the side panel line up with corresponding holes on the bottom panel. If holes don't align, adjust the panel's position slightly. This dry fit verification saves you from driving screws into misaligned holes. Once alignment is confirmed, take your Phillips head screwdriver and your first screw. Insert the screw through the top pre-drilled hole first, but do not tighten it completely—leave it finger-tight. This allows the panels to remain slightly flexible for final alignment adjustment.
Insert the second screw at the bottom of the same connection point using the same finger-tight method. Then, if your kit includes dowels for this connection, carefully insert the dowel into the center pre-drilled hole, ensuring it goes in straight and doesn't bind. With all fasteners finger-tight and any dowels inserted, now tighten each screw gradually in an alternating pattern: tighten the top screw a quarter turn, then the bottom screw a quarter turn, then the dowel area a quarter turn, repeating this process until all fasteners are snug. This alternating tightening pattern ensures even pressure distribution and prevents the joint from becoming unequal or warped.
Repeat this entire process on the other end of the bottom panel, attaching the second side panel with the same careful alignment and alternating fastening method. At this point, you should have a U-shaped structure when viewed from above, with the bottom panel connected to both side panels.
Step 2: Installing the Back Panel
The back panel is a critical structural component that provides rigidity to the entire unit. Inspect the back panel before installation—some models have the back panel slide into grooves cut into the side and bottom panels, while others use traditional screw connections. Check your instruction manual to determine your model's specific back panel connection method.
If your model uses grooves, carefully position the top edge of the back panel into the groove running along the top of the side panels. Once the top edge is secure in the groove, gently push the back panel downward and inward, allowing it to slide smoothly into the grooves on both side panels simultaneously. You may need to apply gentle pressure to ensure the panel slides fully into position. Do not force it, as excessive pressure can crack the panel or damage the grooves.
If your model uses screw connections instead of grooves, align the back panel flush against the back edges of the side panels, ensuring the bottom edge is flush with the bottom panel. Verify alignment before fastening. Insert screws according to your manual's diagram—typically you'll find five to seven pre-drilled screw holes positioned around the back panel's perimeter. Using the same finger-tight method as before, insert all screws but don't fully tighten them until all are started. Then, using the alternating pattern, gradually tighten each screw in sequence.
This step is particularly important because the back panel transforms your U-shaped structure into a rigid box shape. A properly secured back panel prevents the box from twisting or racking (moving out of square), which would prevent the door from closing properly later.
Step 3: Securing the Top Panel
Position the top panel on your partially assembled bread box. Before fastening, verify that the top panel aligns evenly with the top edges of both side panels—there should be no overhang on any side. For corner models, ensure the angled edge of the top panel aligns with the corner angles. If your model uses pencil alignment lines (visible marks on the panels showing exact placement), position the top panel exactly on these lines, as they guide precise placement for proper door function.
Using screws appropriate for this connection (typically the longer variety if dowels are also used), attach the top panel. Start with corner connections first, ensuring the top panel meets the side panels at perfect right angles. Use temporary clamps or have an assistant hold the top panel steady while you insert the first screws at each corner. Again, use the finger-tight method and alternating tightening pattern. Once corner connections are finger-tight, move to any center screws and secure those in the same gradual alternating manner.
Some models feature dowels at the top panel connection for additional strength. If your model includes these, ensure each dowel is inserted fully into its hole with no gaps or wobbling at the joint. A properly secured top panel should feel completely rigid when you press down on any area—there should be no flexibility or give.
Step 4: Goozii Corner Bread Box Instructions - Installing the Movable Shelf
Locate the movable shelf component—this is typically a single flat board that divides the interior space into upper and lower storage sections. Examine the interior side panels carefully to identify the shelf support grooves or brackets. Most Goozii models use simple groove systems cut into the interior faces of the side panels. These grooves run horizontally and are positioned at varying heights to allow shelf placement flexibility.
Position the shelf at your desired height. For optimal balance, many users prefer placing the shelf in the center position, but it can be adjusted higher to accommodate taller items on the bottom or lower to create more upper storage space. Carefully slide the shelf into the grooves on the left side panel first, ensuring it goes fully into the groove without any binding or resistance. Once the left side is properly seated, align and slide the right end of the shelf into the right side panel's groove, again ensuring full insertion.
The shelf should sit level and completely still once both ends are seated. If the shelf tilts or rocks, remove it and check the grooves for debris or misalignment. Some Goozii models include small brackets instead of grooves—if this is your case, position the shelf on the brackets and, if screws are provided, secure the shelf to the brackets using small wood screws. Do not over-tighten shelf screws, as excessive tightness can warp the shelf or crack the brackets.
Step 5: Attaching the Front Door
This step requires the most precision of the assembly process. The door must be perfectly aligned to function properly. First, examine the hinges—your bread box will have either two or three hinges per door depending on the size. These hinges are typically pre-installed on the door panel, but verify this by checking your manual.
Position the door against the front opening of the bread box frame. The door should hang straight with the top and bottom edges parallel to the top and bottom panels of the box frame. Maintain uniform gaps on both sides of the door (typically around one-eighth inch) to allow for smooth opening and closing. If the gaps are unequal, the door will bind or not close properly.
Have an assistant hold the door in the correct position, or use temporary wedges and shims to maintain the door's position while you work. This is critical—the door cannot move during hinge installation. Once the door position is locked in place, locate the hinge screw holes on the side panels. These will be pre-drilled holes corresponding to the hinge positions on the door.
Install the first hinge screw at each hinge location, but only hand-tighten—do not use the screwdriver to apply full tightness yet. This allows you to make minute adjustments if needed. Once all first screws are hand-tight, test the door's movement by carefully opening and closing it. The door should swing freely without binding or sticking. If the door binds or sticks, loosen the first screws slightly, adjust the door position, and retighten. Only after confirming smooth operation should you tighten the hinge screws fully.
Install remaining hinge screws in the same manner—hand-tight first for adjustment capability, then full tightening after confirming proper operation. For three-hinge doors, install the middle hinge last after the top and bottom hinges are firmly secured, as this provides additional support and prevents door sag.
Step 6: Installing the Magnetic Latch System
The magnetic latch system is what keeps your bread box door securely closed without requiring manual latches or visible locks. This system has two components: the magnetic keeper and the strike plate. Your door should already have the magnetic keeper installed on its inner face (check your manual to confirm).
Close the door fully and gently press it against the bread box frame. The magnetic keeper should contact a corresponding strike plate mounted on the frame. Most Goozii models use self-aligning magnetic latches that function effectively if the door is installed correctly. However, precise alignment ensures maximum holding strength and smooth engagement/disengagement.
If your magnetic keeper is pre-installed on the door, you need to install the strike plate on the frame. Locate the strike plate component—it's a metal plate typically with a hole or recess to accept the magnetic keeper. Position it on the interior of the bread box frame directly opposite where the magnetic keeper touches. Mark the screw holes with a pencil or marker. Using a small drill bit slightly smaller than your fastener size, carefully drill pilot holes at the marked locations. Pilot holes prevent the wood from splitting when you insert screws into hardwood or bamboo.
Insert the strike plate screws using your Phillips head screwdriver. Tighten these screws snugly but not excessively—you want firm connection without stripping the screw holes. Test the door closure multiple times. The door should close with a satisfying magnetic click and open easily with a gentle pull on the handle.
If your model features an adhesive-backed magnetic system (some Goozii models use this modern approach), clean the frame surface thoroughly with a dry cloth to remove any dust or debris. Peel the protective backing from the strike plate's adhesive side and press it firmly into position on the frame, directly opposite the magnetic keeper on the door. Hold pressure for 30 seconds to ensure strong adhesion. Allow the adhesive 24 hours to cure fully before using the bread box.
Step 7: Attaching the Wooden Handle
The wooden handle provides both functional grip and aesthetic appeal to your Goozii bread box. Examine the handle to understand its mounting configuration—most handles have two screw holes positioned a standard distance apart. This distance is critical for proper installation.
Position the handle on the center of the door, aligned horizontally at approximately hand-height (typically one-third down from the top of the door). Using a measuring tape and level, ensure the handle is perfectly centered and level. Mark the screw hole positions with a pencil, making small marks through any pre-drilled holes in the handle or by measuring the hole-to-hole distance if marking on a blank surface.
Using a drill bit slightly smaller than your handle mounting screws, carefully drill pilot holes at the marked positions. These pilot holes are especially important when mounting to the acrylic window area, as acrylic can crack without pilot holes. Be very careful not to drill completely through the door—drilling out the back side will damage the exterior finish.
Once pilot holes are drilled, position the handle over the holes and insert the first mounting screw. Do not tighten fully—hand-tight only. Insert the second screw in the same manner. Verify that the handle is still level and centered before fully tightening the screws. Use your Phillips head screwdriver to firmly tighten both screws, but avoid excessive force which can strip the holes or crack the acrylic.
Test the handle operation by gently pulling and pushing—it should feel secure with no movement or wiggling. If there's any play in the handle, one or both mounting screws may need additional tightening.
Step 8: Goozii Bread Box Assembly Instructions - Applying Feet
This final assembly step protects both your countertop and your bread box. Examine the bottom of your bread box—you should see either pre-drilled holes for screw-mounted feet or a clean surface for adhesive-backed foot stands.
For screw-mounted rubber feet (typically four feet positioned at each corner): Position the first foot at the bottom-left corner of the bread box. Align the foot's screw holes with the pre-drilled holes in the breadbox base. Insert the first screw finger-tight, then adjust foot position to sit perfectly flush. Once positioned, fully tighten the screw. Repeat for all remaining feet. The feet should contact the countertop evenly, supporting the bread box without tilting.
For adhesive-backed silicone foot stands (typically three stands positioned to create a tripod, or four stands at corners): Clean the bottom surface of the bread box thoroughly with a dry cloth to remove all dust and debris. Peel the protective backing from the first foot stand's adhesive side. Press the foot stand firmly onto the cleaned surface, ensuring it's positioned at a corner or as shown in your manual's diagram. Hold pressure for 15-20 seconds. Repeat for all remaining foot stands. The adhesive should set fully within one to two hours, during which the bread box should remain undisturbed.
Step 9: Final Inspection and Testing
Before using your Goozii bread box, conduct a thorough inspection of all assembly work. Walk around your bread box slowly, examining all visible joints and fasteners. All screws should be firmly seated with no gaps between the panels and fasteners. The structure should feel completely rigid—press firmly on all sides to verify there's no flexing, rocking, or movement.
Test the door operation multiple times by opening and closing it smoothly through its full range of motion. The door should require gentle pull on the handle to open and should close with a satisfying magnetic engagement. There should be no binding, sticking, squeaking, or grinding sounds. If you hear unusual sounds, check your door hinge bolts to ensure they're fully tight.
Examine the magnetic latch function by closing the door and attempting to open it with gradual increasing force—it should require moderate pulling force to disengage, indicating strong magnetic holding. Once released, the door should stay open without drifting closed.
Verify the movable shelf is firmly positioned in its grooves with no rocking, tilting, or movement when moderate pressure is applied. If the shelf moves, verify it's fully seated in all grooves and check for any foreign objects in the grooves that might prevent full seating.
Confirm all rubber feet or silicone foot stands are making contact with your countertop. Place the bread box in its final location and press down firmly on each corner—the entire unit should feel stable with no rocking or tilting.
Assembly Complete - Usage Notes
Your Goozii bread box is now fully assembled and ready for use. Allow all adhesive components (foot stands and any adhesive-backed latches) to cure for a full 24 hours before placing items inside if you've used adhesive components. This curing period ensures maximum strength and durability.
When placing bread and items inside, arrange them to utilize the shelf effectively. Avoid placing excessively heavy items on the movable shelf, as it's designed for moderate weight distribution. The acrylic window allows you to see contents without opening the door, helping preserve the internal freshness environment.
For long-term maintenance, periodically check all visible screws to ensure they remain tight, as vibration from nearby appliances or movement can cause them to loosen over time. Quarterly tightness checks, especially for door hinges, will keep your bread box in optimal working condition for years to come.
Need a Goozii Bread Box?
Now that you've completed the setup, discover our complete range of premium bread boxes and kitchen storage solutions.
Shop Now Back to Home